JANUARY 17TH, 2023
BODY, SHAPE, FORM ASSIGNMENT
The first thing that came to mind even before I started shooting were hands. I think the people I know have very pleasing to look at hands, and I wanted to compile a series of my family’s hands specifically (so, my sister, dad, and mom). As soon as I had the chance, I borrowed a camera and went home to ask my family to model for me. I had first intended to just do an assortment of my hands and theirs doing varying poses. It worked well, and I even took a picture of my hand with the camera in the other. It was difficult positioning myself on the floor and finding a wall in my room that wasn’t completely cluttered with pictures. This is what my photos were initially going to look like until I decided on fully B&W filter for my series.
-

- dad

-

- meg

-

- my hand

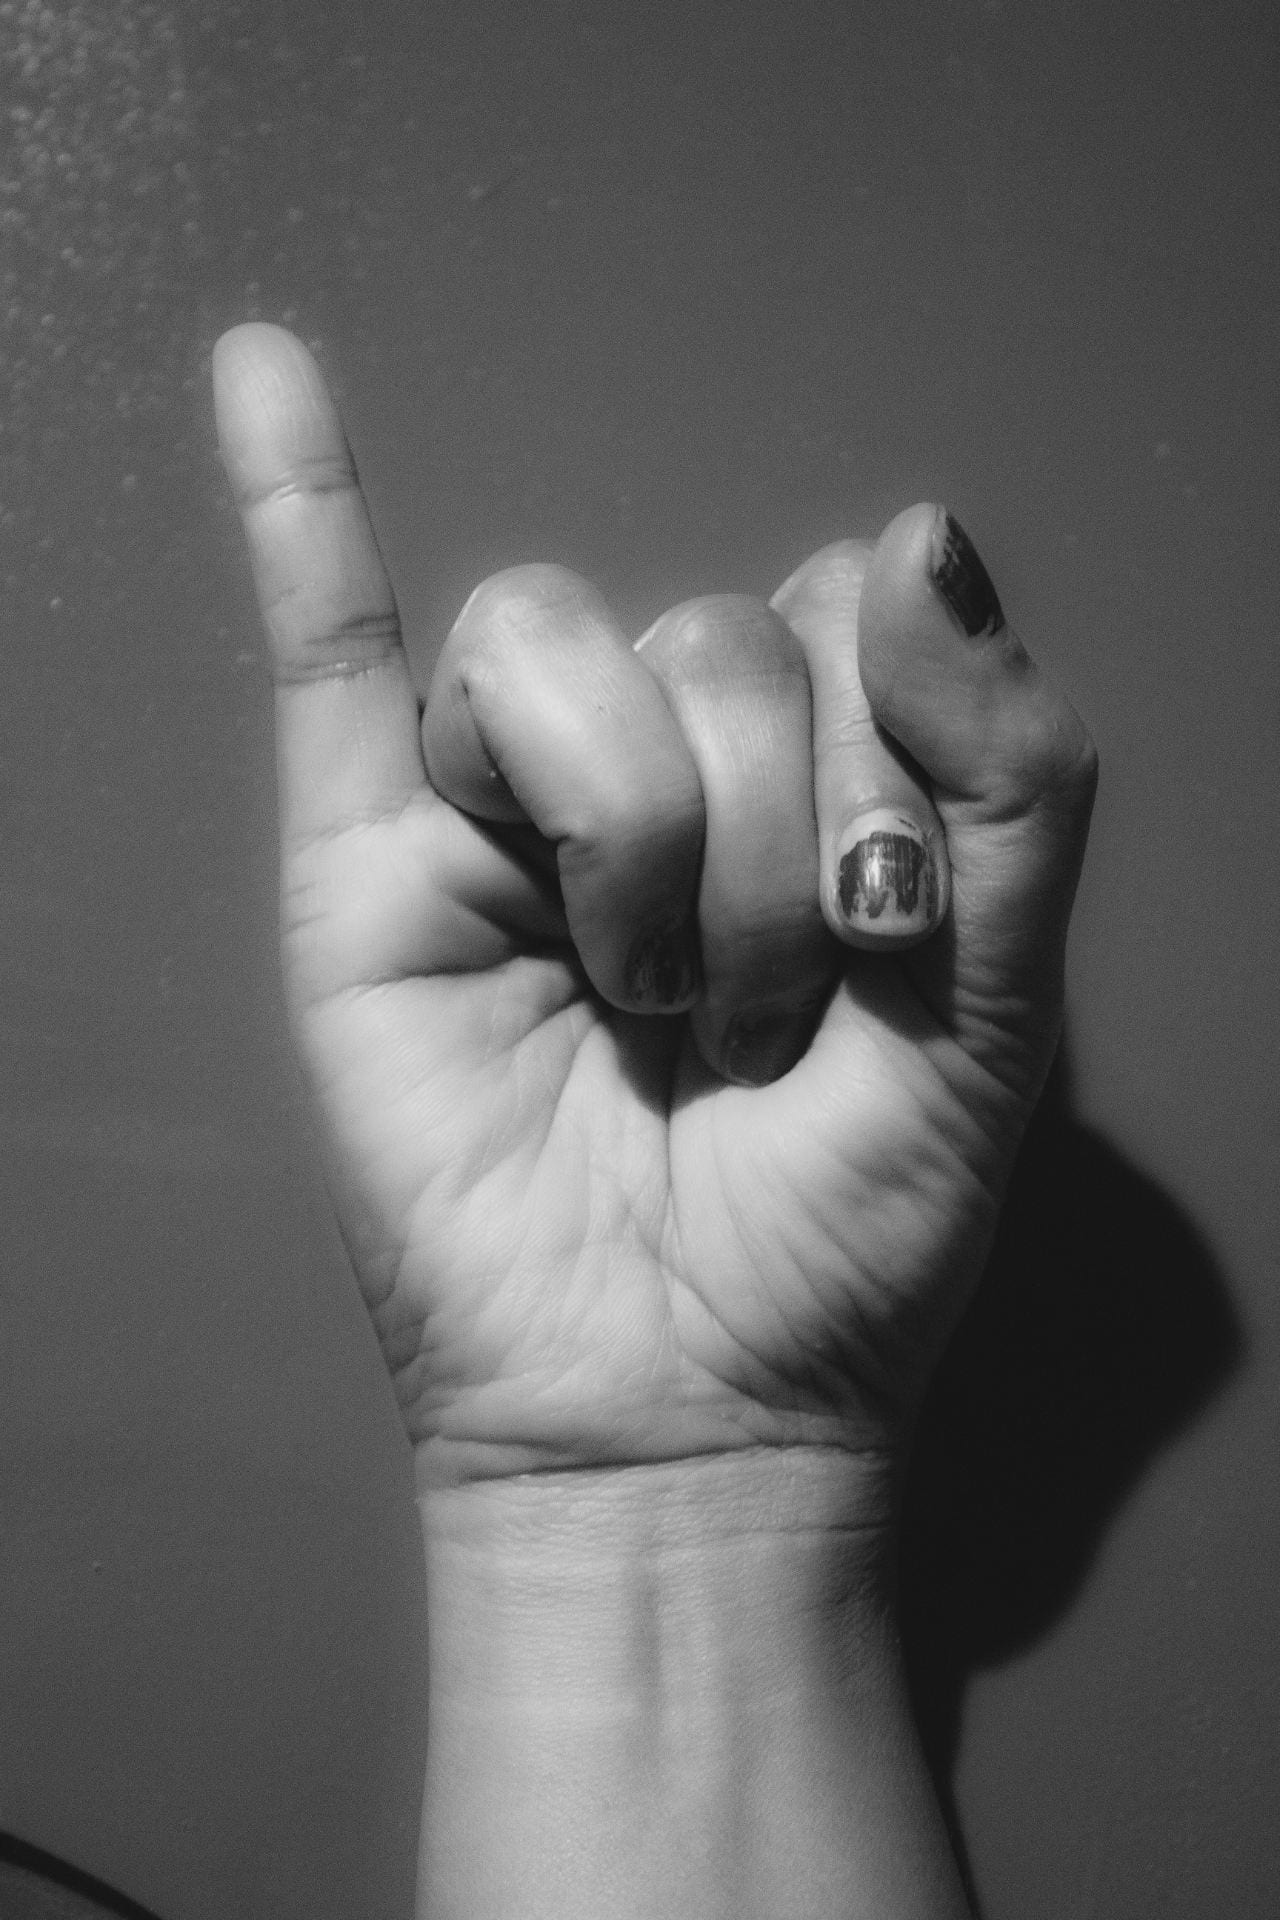
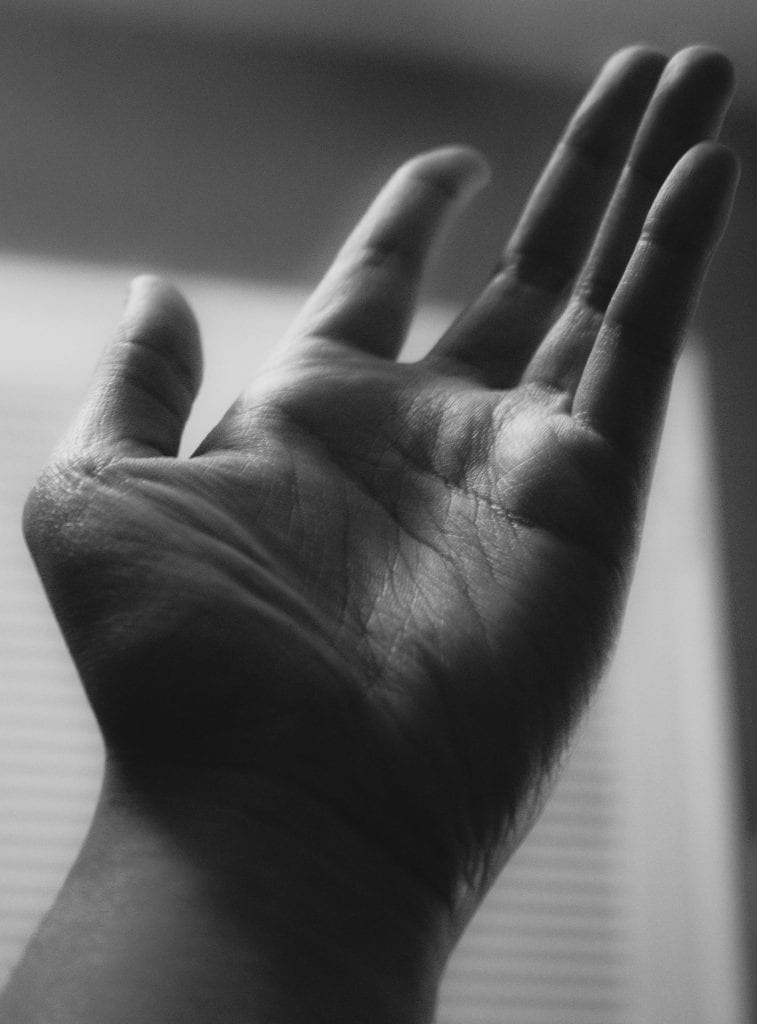
Only a little satisfied, I had an idea to implement ASL into my series. Conveniently, I had enough sets of hands to spell out I.L.Y, otherwise, I love you in sign language. I wouldn’t have gotten the idea if I wasn’t interested in ASL, but thankfully, I am. I liked this set a lot more because it fit my idea of what is unique and the photos themselves are nice in my opinion. This is also what they looked like before I applied two tweaked presets for each set. The backdrop for these photos is a cupboard in my kitchen; I needed a plain one to focus just on the hands, so I settled on this one. It was easy getting photos of my moms and dads, but I had to help my sister up the counter to get a photo of her hand. Otherwise, it was a quick process and I had it all done in a day before I went off to get my pictures edited in Lightroom.
-

- mom: I

-

- meg: L

-
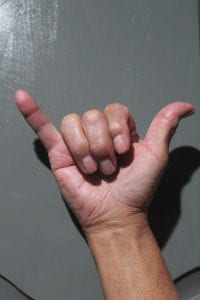
- dad: Y

-

- I
-

- LOVE

-

- YOU

-

- CONNECT

-
- REACH

-

- CROSS

If it means anything, my sister is the youngest (7 years old), my mom is pre-middle aged, and my dad is a bit older. I’d like to think it represents the nice sequence of youth and growing up. I used one Lightroom B&W preset and lightly messed around with it to get what I wanted for the series. I also decided to edit the first set I shot and keep it in but separately.
-

- preset for ily set

-

- preset for 2nd set

I learned a little bit about using presets in Lightroom and actually messing around with the settings this time. While I might need a little bit longer getting used to actually editing with that program, it feels a lot easier to use than Photoshop in some aspects. I really relied on testing out different angles with this assignment and figuring out what looked good when the lighting hit just right. I made sure I had some type of light source, be it just the kitchen light or my bedroom’s ceiling fan, then I worked on actually making it look good. I really hoped my editing made it so that the shadows were more emphasized, especially around some veins, muscle, and just the skin in general. Personally, I think my process went well and that my idea of using ASL as the central concept as one of the sets was a good one. Nothing really indicated a failure for me. I definitely captured a lot of different angles of the hand which was my intention, and getting those curved shapes just right worked alright for me. I feel that a lot of it, especially the one of my own hand, were very angular and accentuated a lot of the curvature of the hands. The focal point is solely on the subject (hand) and really looking into the details of the fingernails, veins, and other parts make it feel somewhat sensory, at least for me. Almost like I can feel the grooves of skin in the images.
I think I feel pretty neutral about the way my sets turned out. They’re pretty good, but the only instance of critical thinking I can see being used is when interpreting the ASL set. Otherwise, I am satisfied with the editing and especially the one of my own hand, since I felt that was the hardest to capture.
JANUARY 14, 2023
KEITH HARING INSPIRED WORK ASSIGNMENT
I decided on making a physical work for my Keith Haring inspired piece. The plan I had in mind was simple, but I mostly just did what I was able to during the entire process. I didn’t exactly have a set idea or message ready to convey in mind before starting, but after completing it & reflecting, I think I wanted to portray a stylistically similar but drastically different meaning piece. After looking at an embarrassing amount of Keith Haring dog art, I started a rough sketch on what I wanted my piece to look like (credit & love to Indira for the sketch paper and kudos to Shayari + Mel for the support and sharpie markers).

-

- MOVED TO NEW PAPER & STARTED LINEWORK

The supplies used were sharpie markers and sketchbook paper. I also ended up using a scalpel to cut out the colorful people. I really badly wanted to make a huge posterboard and draw with those fancy ink markers (I felt that those were the most able to capture Haring’s style) but I did not have the time nor the materials for that. For some reason, after I finished lining and coloring in my little Haring people, I really wanted to bring the work home to cut them out and rearrange them onto a completely different paper. I wanted to capture a sort of minor 3D effect (which didn’t work fully as it didn’t accentuate the places I wanted my method to) and colored in a solid square background with a bright yellow to make it my backdrop. I also just wanted to add my own spin so that it wasn’t just Haring’s work, as if I hadn’t already made my piece’s message completely contradictory to Haring’s messages.
-

- my absolutely horrendous workplace (the floor)

-

- proof of 3Dness??

-

- blood alternative
-

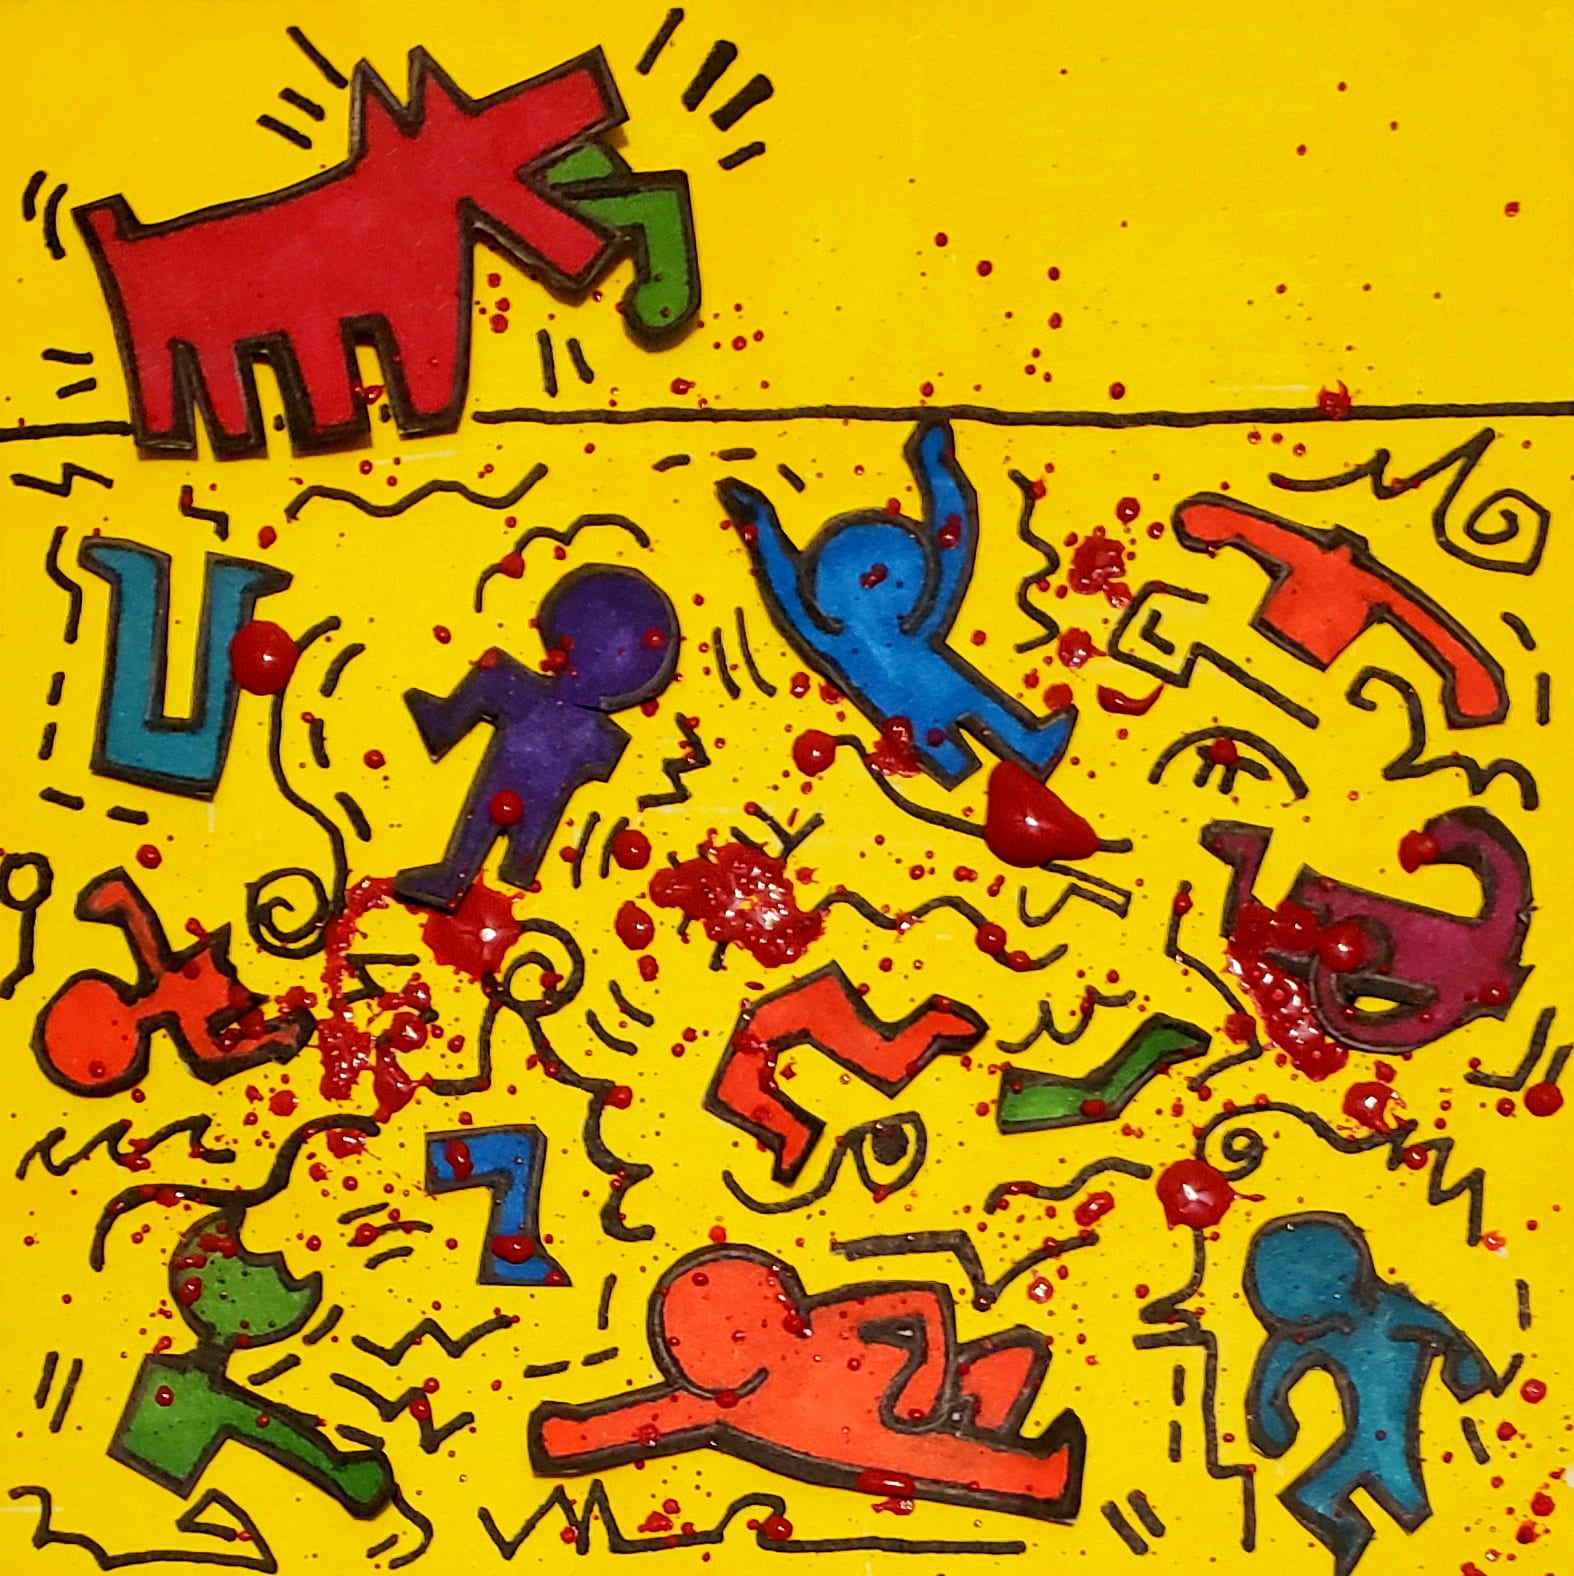
- final draft (lightly edited)

Here’s the finished pieces! To put my work’s message briefly, my intentions were creating a lightly contradictive piece that sort of clashed with Haring’s official works. I found that some of his art that weren’t just the neat guys dancing portrayed a lot of peace & love, practicing safe sex, queer love, etc. Not to say I didn’t enjoy any of it, because I think it’s all pretty good, but I wanted to poke some fun and just do what I wanted to do: rip up the little guys and let the dog run its massacre. There isn’t a real hard-hitting message to any of it, and the blood alt was just an added touch I decided on. I’d say I learned a lot about handling a scalpel when it came to working with art, and also being patient with actually cutting the pieces out. To me, this felt like a really let-loose assignment, and I enjoyed my finished product & less enjoyed the time I had to put into the little details. I hope that this experience will be something to look back on when it comes to keeping patience with emphasizing the most intricate.
DECEMBER 2ND, 2022
MAKE A STATEMENT ASSIGNMENT
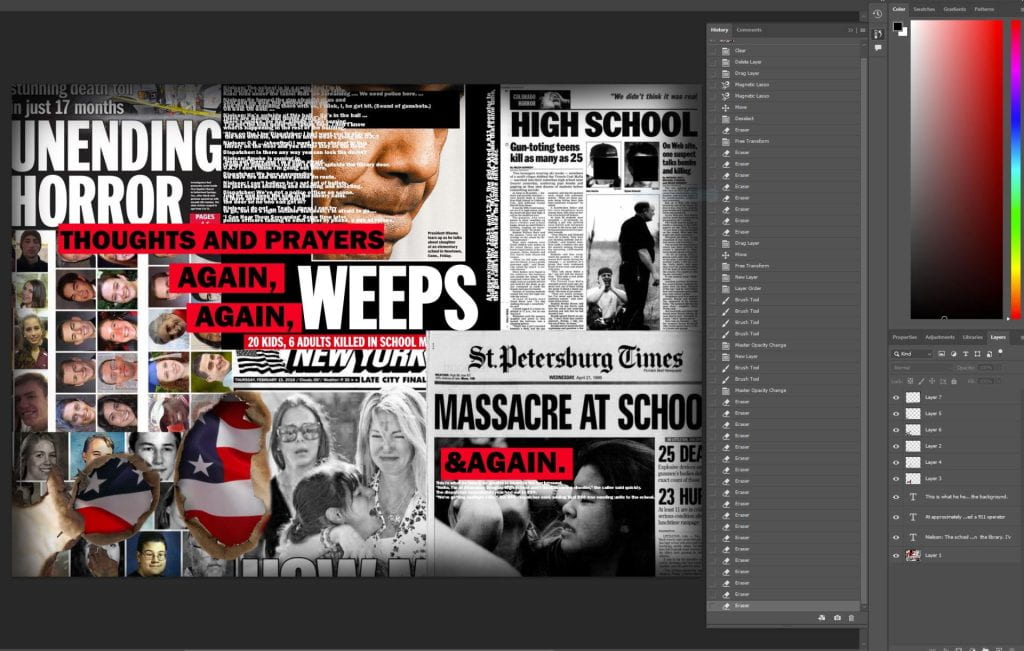
I focused my assignment on the commentary surrounding school/mass shootings. It wasn’t hard for me to portray what I wanted to, and, in the tone I hoped for because I would say I firmly trust in my stance on it. Despite what I think about current gun laws, plenty of lives have been lost to the unfortunate occurrence of people misusing their rights and taking out their anger on those who are simply living. On way too many occasions have the press over dramatized shootings and disrespected the victims past no return; our nation’s officials only express their sorrow in a similar way with empty promises and no real attempt for change. There have been around 600 mass shootings this year alone, one of the most infamous being the Texas Robb Elementary shooting. President Biden visited the state and expressed a pitiful speech before leaving. The only other updates I can recall coming from him and others are half-assed attempts to sympathize with the victims while using the shootings as arguments against republican officials. “Thoughts and prayers,” has been an overused and overplayed quote of these people who all demand change but do not do anything about the failed individuals turned perpetrators and the overly violent mass-produced guns.
-

- HISTORY + LAYERS

-
- PROGRESS

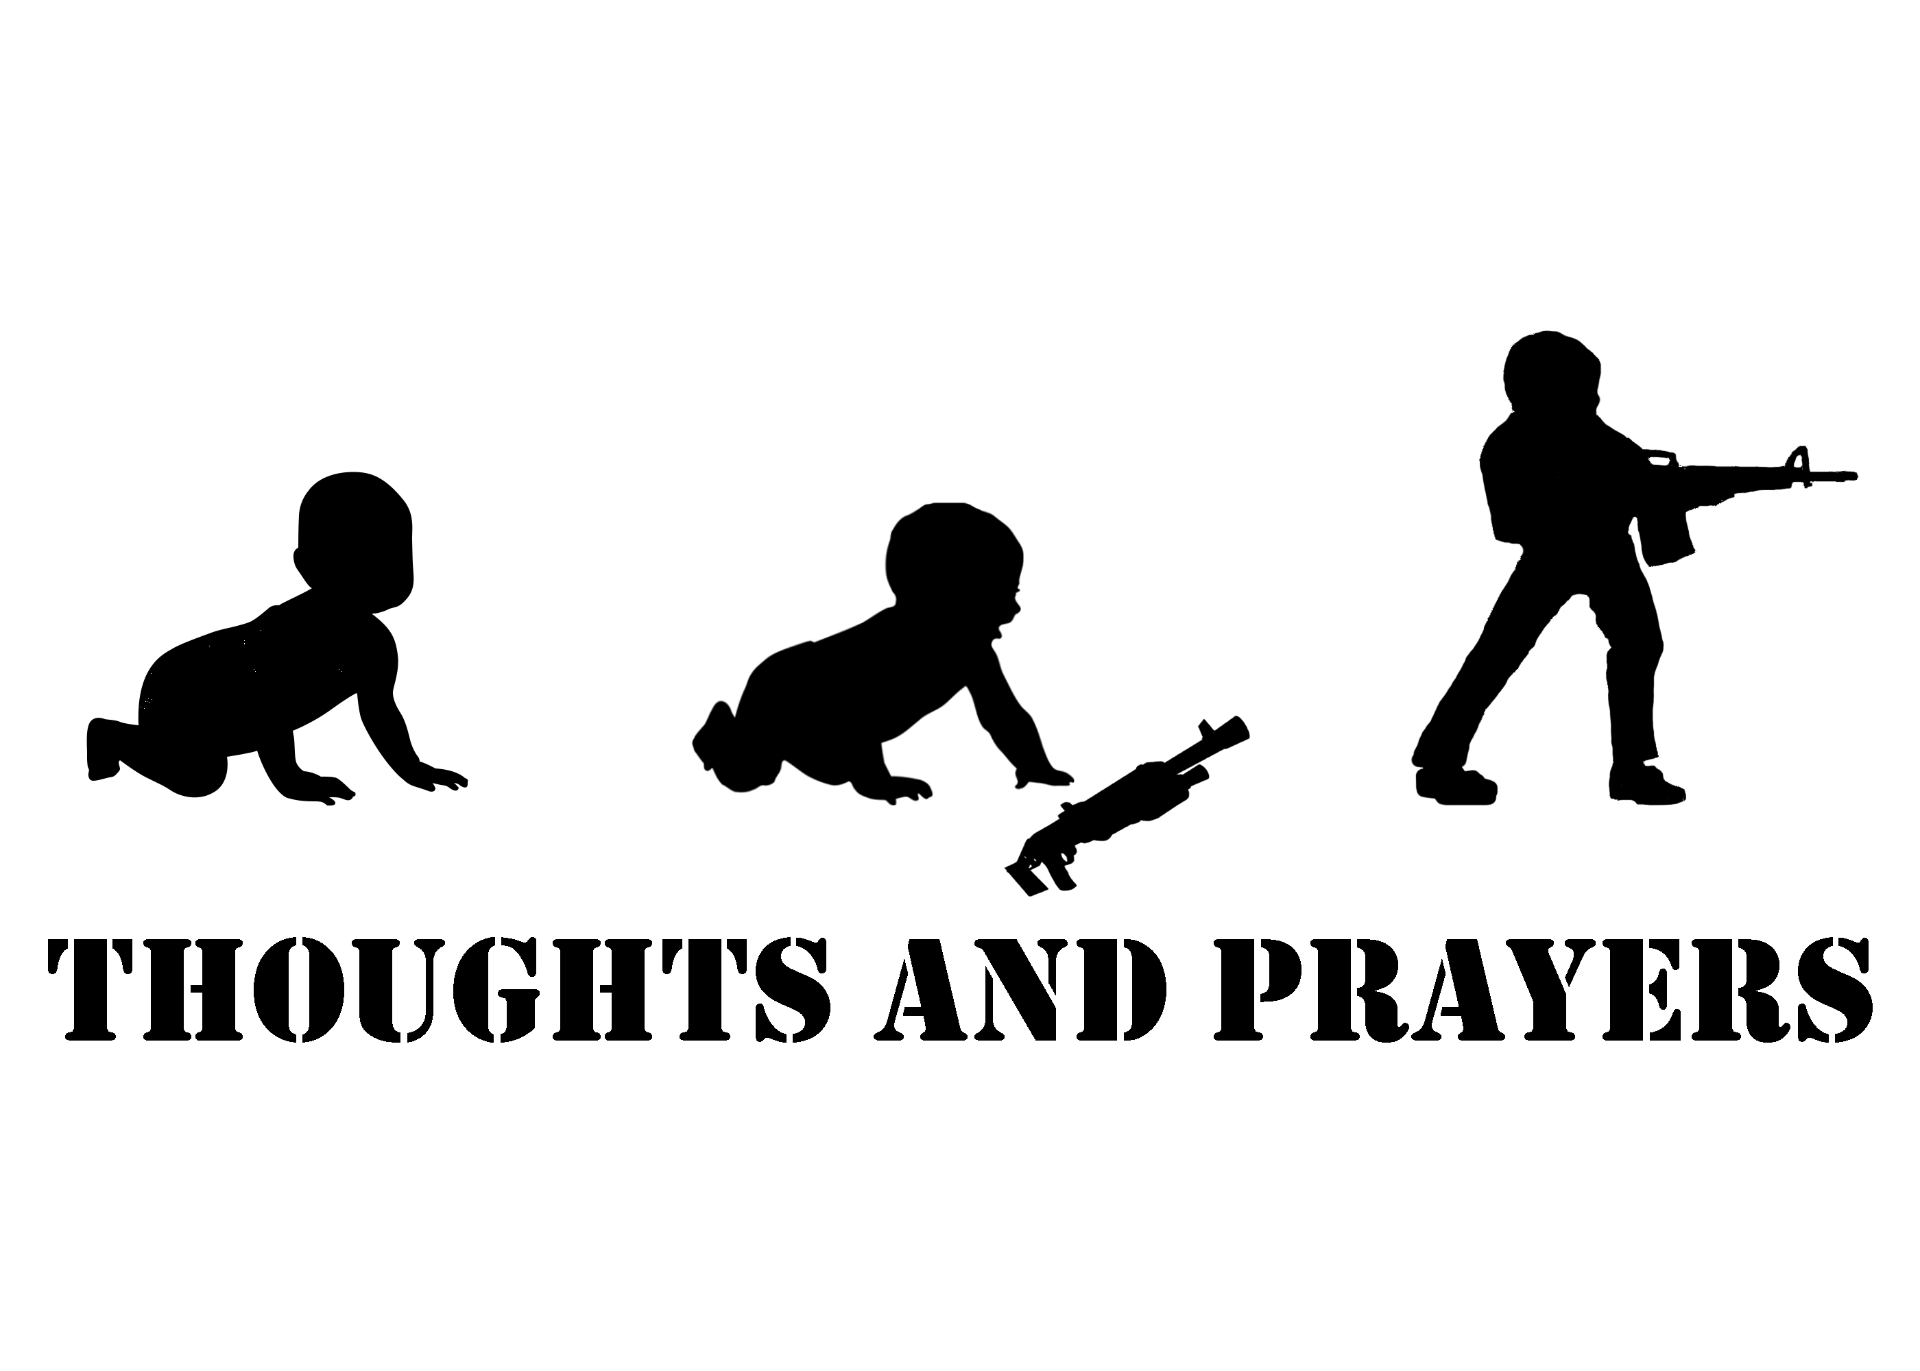
Originally, I had wanted to do a story sequence of a baby discovering a shotgun and transforming into a gun-wielding teenager. It was a simple design that I was not extremely satisfied with. I had to do editing with the last image because it had been cut off, so that was the most difficult part of the project. I used threshold on the baby outlines and the teen themselves.
statement assignment first draft
I was partly inspired by that one artist who puts simple font texts over blocks as overlays for their photos. I recall seeing their work in the Broad, but I do not remember their name. Ironically, their work was my least favorite, but I felt it would’ve fit for the message I was conveying. I went for a bold, maximalist layout full of photos to look at and details to squint at. The texts are intended to be a catching red, and the burned spots revealing the American flag underneath is another layer that pokes at the country that can overlook the brutal deaths of thousands of children.

THOUGHTS AND PRAYERS final draft
This is the final and completed draft of the assignment. I added a light border as an overlay and snuck in minimal editing aside from the flag as to not distract from the tragedy on the pages. The white text lined up on the photo of censored Obama is harder to look at, but it is part of a call transcript from the day of Columbine High’s massacre. The photos of the victims are from assorted shootings, spanning Columbine, Virginia Tech, and Parkland.
I think I was well satisfied with how this turned out. While I would’ve hoped to do a physical collage full of my own art and photos, I didn’t believe I had much time to do so. I’ve done a few projects in the past on crime, especially shootings, and it gets disheartening to see the constant repeat of something we could probably control if we tried really hard. I see statement art on shootings from years ago, and it’s fascinating to see that it’s still happening, and even in larger numbers. I feel I could’ve done better with incorporating more “hard-hitting” media into this, because I really wanted to get more across in a larger collage, but I am appreciative of the effort I put into this and piecing it together on Photoshop.
NOVEMBER 17TH, 2022
MIXED MEDIA ASSIGNMENT
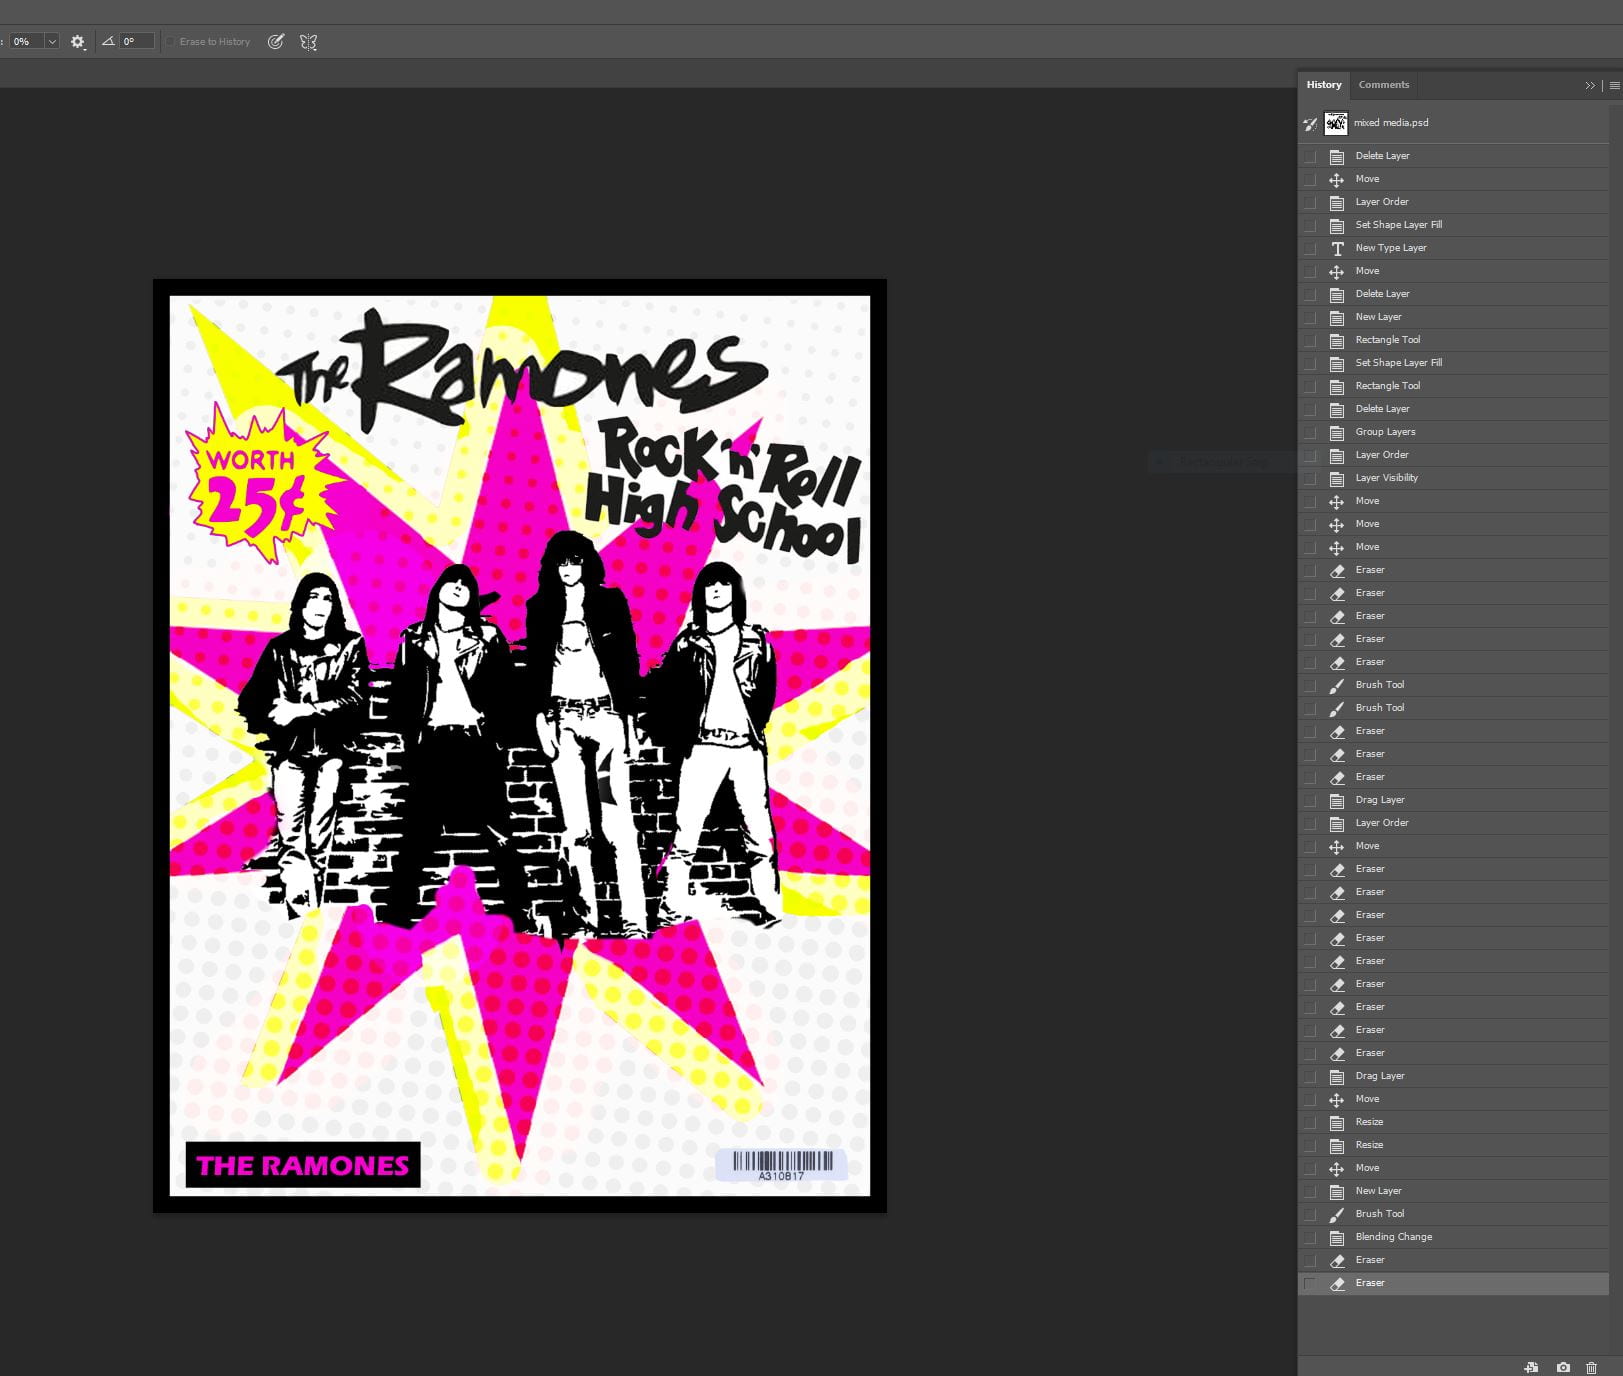
I decided to do my mixed media in Photoshop. I wanted to replicate a punk 80’s mag with my Ramones screen-print, so I first looked at a bunch of examples.
- I started off with a completely blank slate and pasted my screen print onto it. I used a bunch of assets online to decorate it.
- After editing the Ramones logo and the Rock n’ Roll High School one, I positioned them on the canvas.
- I found neat clipart for a barcode and the price sticker, so I added them to make the magazine effect.
- I made the spiky stars in the background hot pink and yellow for that classic punk combo.
This was really fun! I didn’t have many issues except for the deal with Photoshop (layers and whatnot, but I navigated them easy with Google) and I ended up with a pretty simple but effective design. I liked how freeform this assignment was, plus the screen printing was fun by itself so this was even better, making my own project out of it. I hope to implement this kind of style in assignments that focus more on mixed media in the future, as I really like this type of messy grunge look.
-

- HISTORY
-

- LAYERS

HERE’S THE FINAL PRODUCT!

FINAL PRODUCT
NOVEMBER 8TH, 2022
PROCESS PORTFOLIO FOR SCREEN PRINTING
I chose my photo after deciding on a band logo. At first, I wanted something to do with DEVO or Talking Heads (especially Talking Heads, because their band logo is a mix of red and black. It would’ve been really cool!) but I decided on Ramones because I saw a screen print of The Police and it looked pretty cool, having that gritty punk look. I also ran the photo through Photoshop to fill in some blank areas with more black lines. After getting it printed out, I set out to getting it burned into the silk screen.

SCREENPRINT OG PHOTO
I followed instructions with the solution needed for burning the photo in and coating the screen. A few days after the screen had dried, I went through the process of getting my image burned in. Leaving it on the board for 18 minutes in a light source worked for me.
-

- coating/cleaning the screen

-

- finished image

After getting these done, I had to do a test run with some paint on construction paper. I made two papers, one with white paint on black, and black paint on yellow. I liked the yellow paper much more. I ended up shipping the black one off to my stepbrother.

I had to continuously wash off my screen after every use, and soon, on Thursday, I decided to get a print on a spare white shirt. I asked my mom to grab a cheap one and I printed it on the day after. I had no real problems with any of these processes as I had a clear print and a good method of getting the paint through the screen. I only had to cover a few spots with tape because they were exposed, but it was nothing bad.

shirt
I think the entire screen-printing process for me went very well. I didn’t have many problems except for washing out my board after every use. I really like my new shirt, as well as the prints I got out of it. The most challenging stage of this process was the time I had to put into tediously washing my screen, but it was overall a very enjoyable experience, and I got prints out of it that I really ended up liking.
OCTOBER 19TH, 2022
I brought my camera and memory card to school to get my photos uploaded and my story finished. I did not edit my photos very significantly in Photoshop, the most I had done being lowering the saturation and fixing the brightness on some. I uploaded my pictures to Adobe Express and started typing up my captions and piecing together the story.
OCTOBER 17TH, 2022
I began working on taking photos today, and it set an idea of what I’d shoot for the rest of the week. I’d piece together photos of my sister preparing for school, messing around at home, and being picked up on campus.
OCTOBER 16TH, 2022
While I had my camera over the weekend, I planned to take photos of rotting fruits and wilting flowers to create a sequence of old and dying things. Just as soon as I whipped out my camera, my mom told me to try taking photos of my little sister instead. At first, I decided against it because I really wanted to create a lifespan type sequence spanning from life to death. I changed my mind and decided to do the story based on my sister in the end because I figured it’d be a good change to what I usually shoot.
OCTOBER 7TH, 2022
For my photo recreation, I chose a promo photo for my favorite movie, Re-Animator. The photo features Jeffrey Combs who plays Herbert West. I’m greatly inspired by media similar to that movie, so I chose it. I also really enjoyed the lighting and overall tone of the photo and wanted to capture that by myself. Herbert West is a personal favorite character of mine, which is another reason I chose it. The process was somewhat tedious as it was definitely out of my comfort zone, but I came out with results I liked.
- After choosing my photo, I went home to shoot. I had a Canon EOS camera and shot it in automatic and manual. I also had a tripod to help frame and position my photo.
- For the set, I used a folding table and used my own props from my room. I just so happened to have bottles, tubes, and a microscope lying around, so I used that.
- For my own appearance and matching myself up to Dr. West, I used my own costume of him. This included some black slacks, a white button up and black tie underneath a lab coat. I had bought a Re-Animator syringe prop too, so I used that for the main accessory.
- My mom helped me in positioning the camera as I prepared myself behind the table. We shot it all in the living room and drew the blinds. I used a table lamp to imitate the source of light in the photo.
- I tried my best to match up my facial expression to Herbert’s, and I posed the same way he did, the best I could. For the headless Dr. Hill that stood behind Herbert in the photo, I changed into a black suit with a red tie. I took separate photos for that one with the help of my mom. She also helped me with taking photos of my side profile so I could edit it into the tray as the detached head.
- In Photoshop, I first focused on getting the background of my main photo completely black like it was in the original. Afterwards, I edited the headless Dr. Hill into the back and darkened everything except for the prominent parts that was the tie region and the hands. I also cropped out the actual tray from the original photo and edited it in, then later cropped around my detached head to place it in the tray in a separate layer. For the final touches, I worked on the lighting on the face and around the tray especially, so as for it to not look too out of place. I also shaded around the head and used the dodge tool to make some areas lighter. At that point, I was done with what I wanted to get accomplished, and ended up with my product.
-

- in progress of coloring in the background
-

- history and layers
-

- photo info
-


SEPTEMBER 28TH, 2022
I have started brainstorming for my photo recreation assignment. I’ve chosen to do the Reanimator shoot, and I have a plan of how to set it up and also edit it. I was provided a camera and a tripod in order to get a good shot. For the props, I am planning to bring in a table then using science-y equipment to imitate Dr. West’s materials. I’m thinking of doing it in the living room, or maybe even my own room depending on where I can find good lighting and space. Then, I’ll position the camera how I would like it, and use a light source (preferably a warm one) to capture the lighting in the original photo the best I could. The costume and expression I am sure I can pull off alright, but I would just need to focus on getting the technical aspects done with.
SEPTEMBER 27TH, 2022
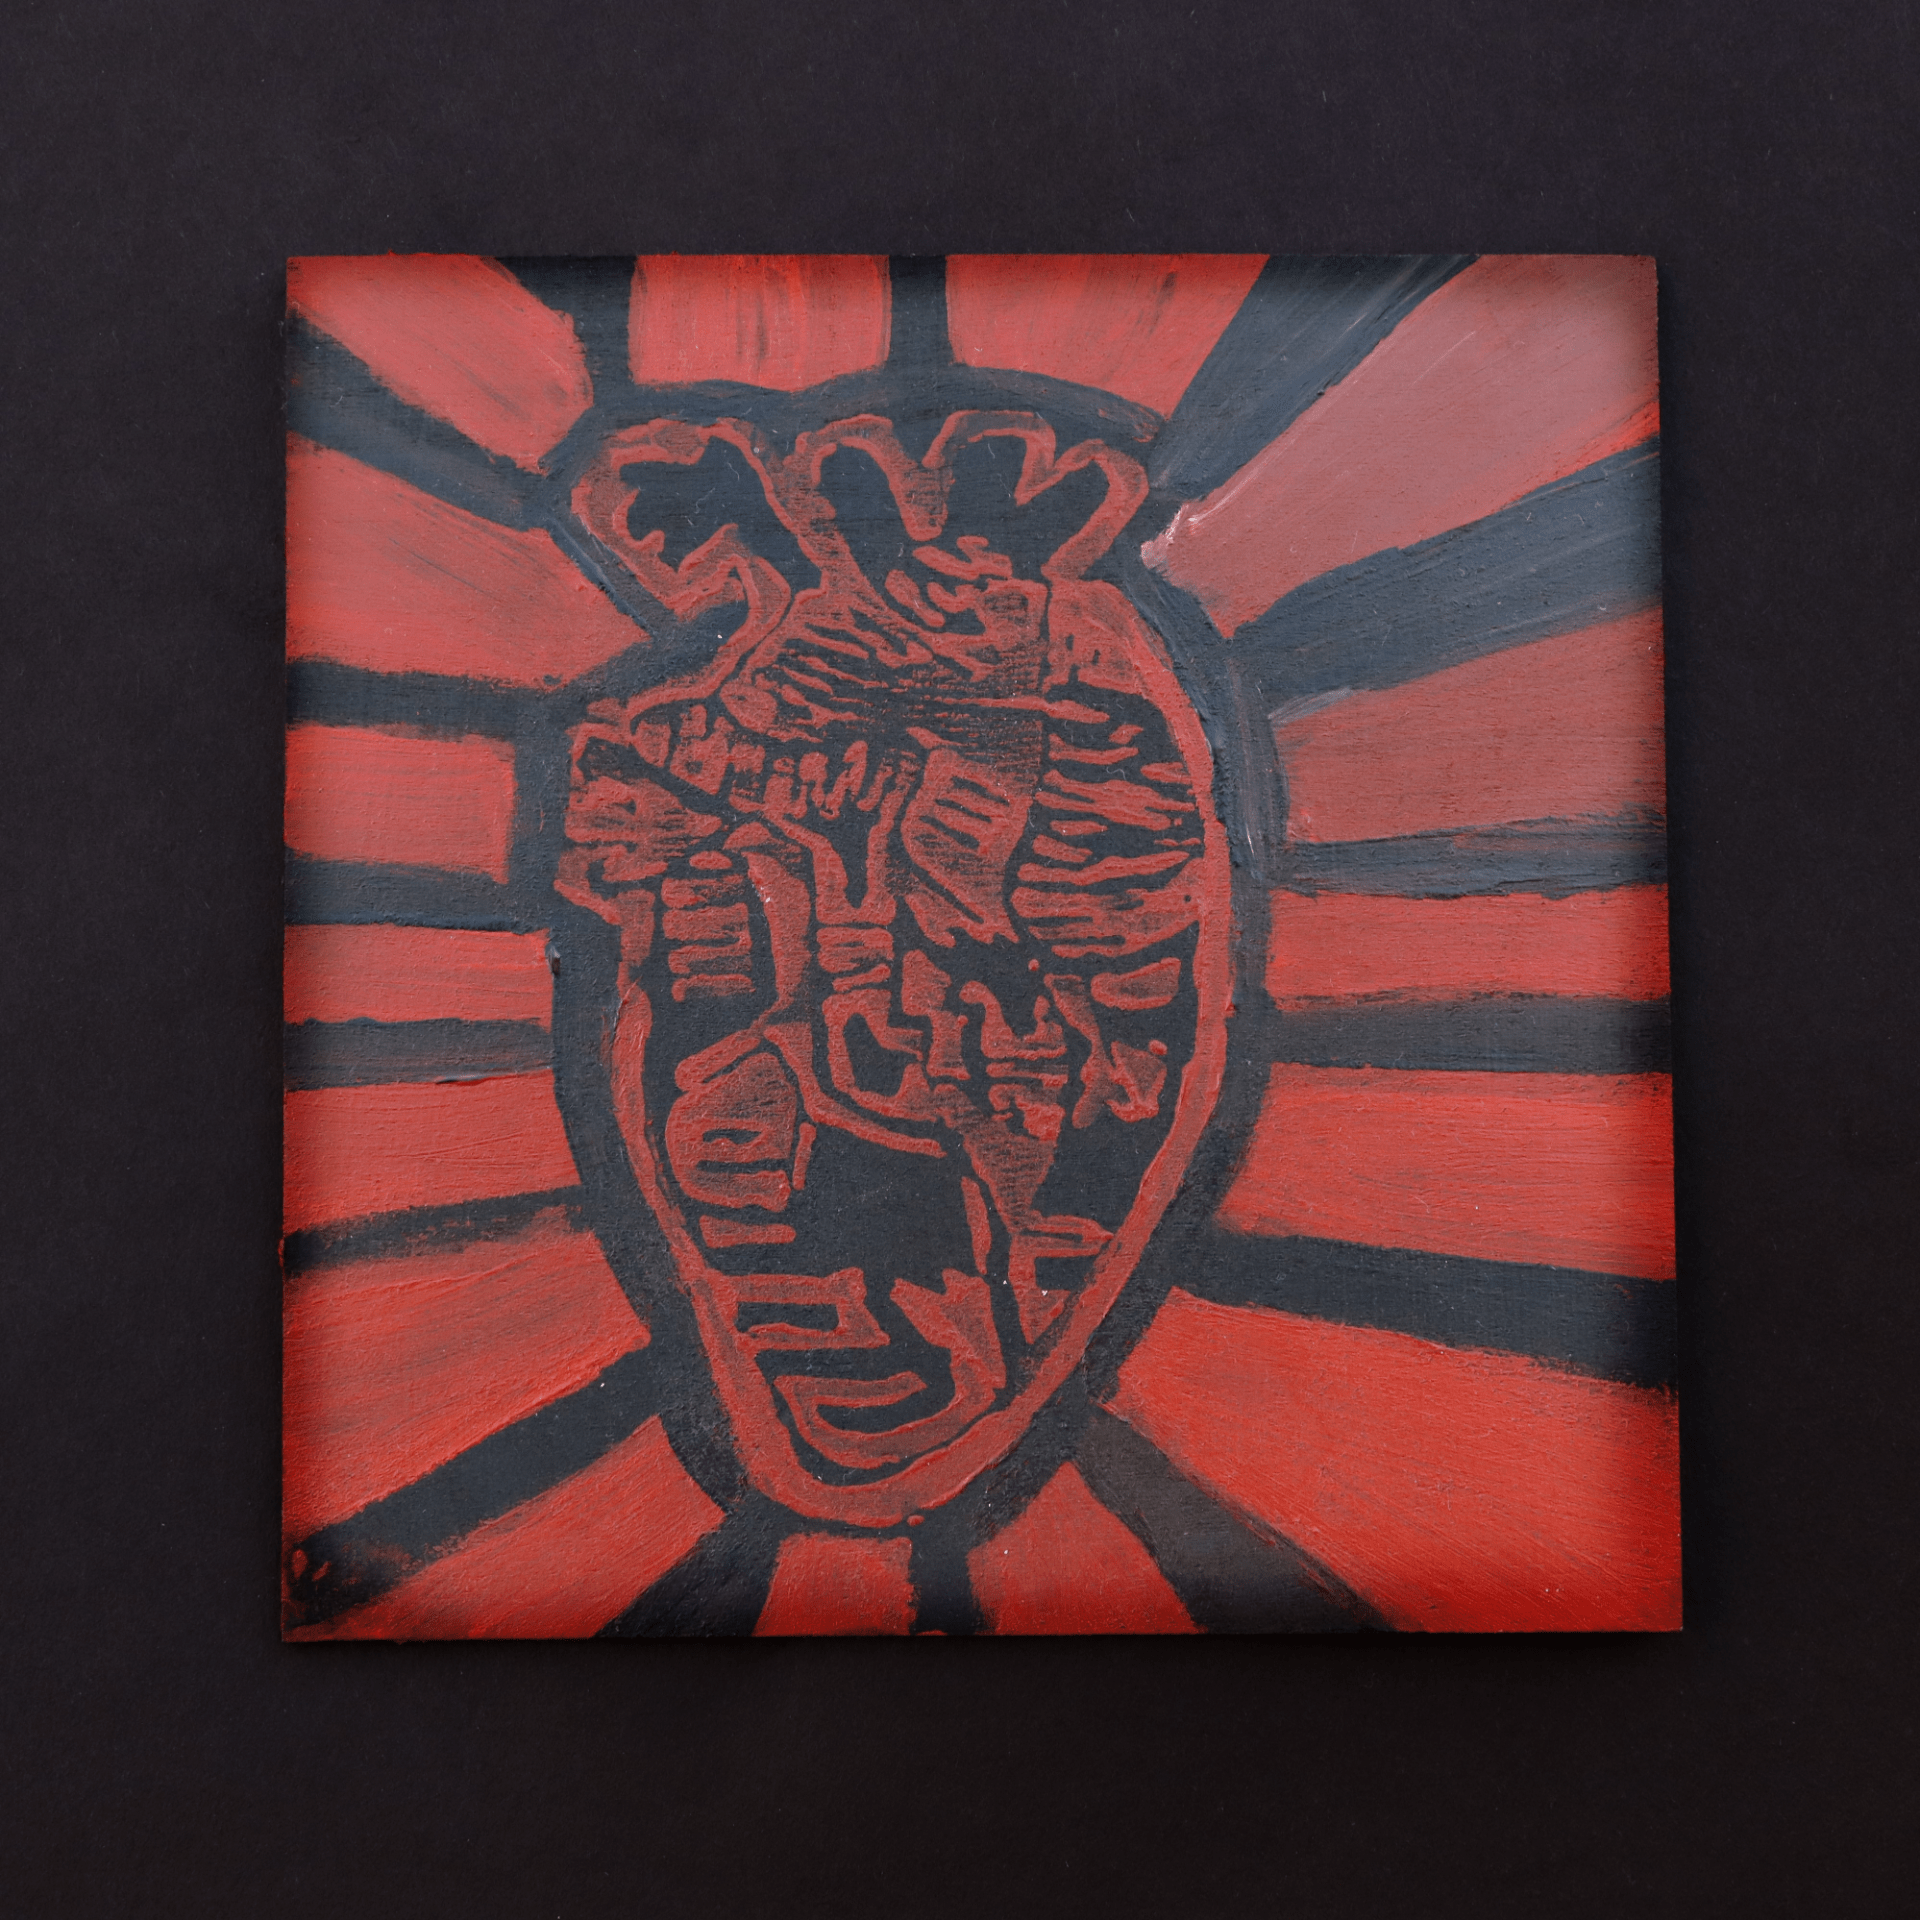
Today, I finally had the chance to take a picture of my dried block print. I used black construction paper as my backdrop and shot it in the shade outside. I used the Canon EOS camera, manual mode. I used Photoshop to edit around the piece of wood, just to darken the background and add depth. I really like how it turned out! I think doing touch ups on it yesterday really helped it look a lot cleaner, and made the colors pop better. Initially, stamping it onto the wood made it look a little muddy, kind of watery; I let it dry a little, then went over it with more red to fill in the space, then went around the gaps with black to make it look neater. Overall, block printing was a fun and exciting form of art to take on. I think that for my first time, I did pretty well. I had some complication prior due to being unsure with how to carve and where to carve on my block, but I can confidently say I ended up with a print that I enjoyed the shape and dimensions of. I was more concerned on what colors to use, but I was satisfied with what I came up with in the end. This was a first new experience for me, and I think that I’ve learned a lot from it, specifically from understanding the product before it would even come out. This process really relied on whether I could trust my eye for what I wanted as my result, and I think I came out with something I enjoy.
SEPTEMBER 26TH, 2022
I am starting to reconsider how I will execute the photo recreation assignment. I’m thinking that for the reanimator photo, I will use my own materials for the props, but I will use Photoshop to emphasize any lighting. I already have the costume and can create a quick black backdrop, however. For The Cure one, I plan to shoot it in my parents’ room as its painted a similar blue. I will probably ask for help from family or a friend to get the right lighting, then I’ll edit in any stars or filters in Photoshop. For the Velvet Underground shoot, like I mentioned before, I’d want to find out a way to gain access to a projector. If I cannot, I will simply choose another photo to recreate, but these are my main ideas as of right now. We also continued to do block printing, and I finally had the chance to lay out my block on the thin piece of wood we were given. I painted it black, then used red ink for the block itself. I had to make a few finishing touches to the paint job and the background, but I think I did well in the progress and carving, especially. So far, my process has been as followed:
- Choose a print, which was a real human heart. I realized it’d be hard to carve, but in all honesty, I just came out with something good looking because I had confidence in the lines.
- Carve the block, paint the wood canvas black, and coat the block with a cool red paint. Stamp it, leave it to dry.
- Take photos of the tools used and the final product, edit in Photoshop and publish.


SEPTEMBER 22ND, 2022
We chose three photos that we wanted to recreate. For my inspiration, I decided to choose a The Cure album cover, a Velvet Underground photoshoot, and a Re-Animator photo. I think I could pull off the little details of these photos, but the challenge will be the technical aspects of it, like the lighting, angles, and backdrops.
For the Re-animator photo, I plan on using a room in my house as a backdrop. I have scientific looking props that I will use for the decorations. I would want to use photoshop to edit my own head in place of Dr. Hill’s head in the tray, and then I could use my own Herbert West costume to model as him. For the Cure album cover, I would edit in the stars over the fingers, and use the fisheye setting. The backdrop I plan to also take from my home, and the I plan on using a light source to shine above me to replicate the photo. For the Velvet Underground photoshoot, I would want to use a projector at school or someplace else (maybe use my own) to replicate the dots, and have one or two friends help model for them.


SEPTEMBER 21ST, 2022
Today, we continued to carve out our block prints. It was fun figuring out where the dark spots would be as opposed to the light ones. I decided to make my background lines that sort of came out behind the core of the heart. We had little time to carve, but I think I made a considerable amount of progress.
SEPTEMBER 20TH, 2022
We started block printing today! First, we watched a demo to get a general understanding of what to do. Then, we got to choose the photos we wanted to use for our print. I chose line art of a human heart as my photo and had it printed. Then, I transferred my tracing of the heart onto the block as a guide for next time when I’d start carving.
SEPTEMBER 19TH, 2022
Today, we all sat around to critique the surrealism photos that everyone shared. I really thought it was cool that some people drew and made their illustrations the main focuses of the pieces; I thought the concepts behind a lot of them were great as well, and the imagery didn’t leave us completely in the dark. Everyone’s interpretations were really interesting to me, and helped open my mind to several different takes.